Thank you for 1000 follows!
I’m blown away. I started this account as a little private experiment, to show some of my photography work. In just 4 months it grew to 1k follows, even I’m not uploading regularly and stopped with my stories due to some projects going on. I promise to start vlogging again soon. I’m really pumped. Thanks for the love, comments, double taps and DMs.
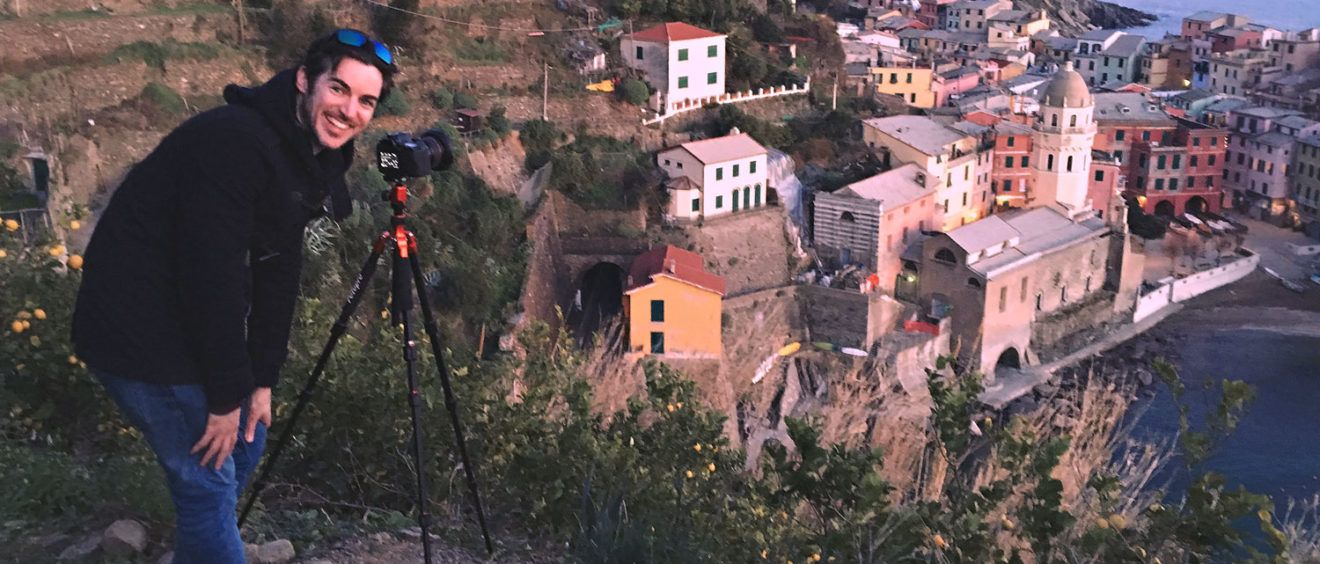
Here is a little behind the scenes of my Vernazza shot two posts ago.
In Vernazza you have a path that lead to the mountain side. Actually this path links all the cities of the Cinque-Terre. When every you visit, I recommend walking at least to one city by food instead of using the more convenient train. It’s very steep but you will be rewarded with breathtaking views. Right at the first corner on the path between Vernazza and Monterosso is a little ledge, where I placed my tripod.
Travel light
When I’m travelling, I use a very cheap but light no name tripod. No carbon fibre or anything fancy. I want to swap the ball head for something more sturdy soon, cuz my camera sinks a lot with the heavy lens.
For this shot I used a Canon 6D Mark I. My first full-frame camera and a workhorse since I bought it 5 years ago. The built in Wi-Fi came in handy for my architectural work and I didn’t need any fast shutter speeds. I love the camera and it was a huge bargain to access the full-frame world.
Tilt shift lenses are a secret weapon for landscape photography
The lens is the Canon TS-E 24mm F3.5 L II and one of the best lenses I bought so far. Yes it is freakin expensive and no one would actually think about using it for landscape photography in the first place. Any wide angle lens would actually do its job but when you are shooting cityscapes while tilting your camera you are dealing with lens distortion and the buildings look crooked. For this Vernazza image, I could easily shift my lens and keep the buildings realistic. Plus you can use the shift feature to take amazing panoramic images, without turning your camera.
Perfect settings for landscape images
I started shooting at golden hour, during the blue hour until dark night. Basically I use at least three images to make my composition. The sunset image during golden hour. The base image during blue hour, with nice colouring on the mountains and the houses. The night image for the city lights. Although I shoot bracketed all the times, here are the settings when lighting roughly gets interesting.
- F8
- ISO 200
- SS 1/5th
I always shoot in manual mode and in RAW. Once the camera reaches these settings, I start taking bracketed shots every 5 minutes. That way I make sure to get the correct exposures.
Post-processing is key for compositions
For post processing, I’m using Lightroom Classic CC for culling and some basic adjustments like exposure, white balance and sharpening. The rest is done in Photoshop. I mainly start with the composition of the image, using luminosity-masks (That is a different chapter though) to blend in all the different exposures. After that, I remove all the unwanted stuff with the clone-stamp-tool or the healing brush. The final step is colour-grading, where I try to get some nice saturated colours.
Should I do a full tutorial about landscape photography?
Leave me a comment down below.
– Dominik –