How to use light painting to your advantage
Technically (uuh I actually hate myself for starting a blog like that!) as a photographer you are already using the light painting technique all the time.
Literally, photography means writing (or painting) with light. The word has a Greek origin, “phos” or “photos” means “light” and “graphê” means “writing” or in a bigger context probably painting.
See, you write or paint light already while taking an image, whether it is on film or on a digital sensor. If you think about the “camera obscura” (link), photographers actually painted the image!
Sorry that was a bit off-topic, so back to the actual question.
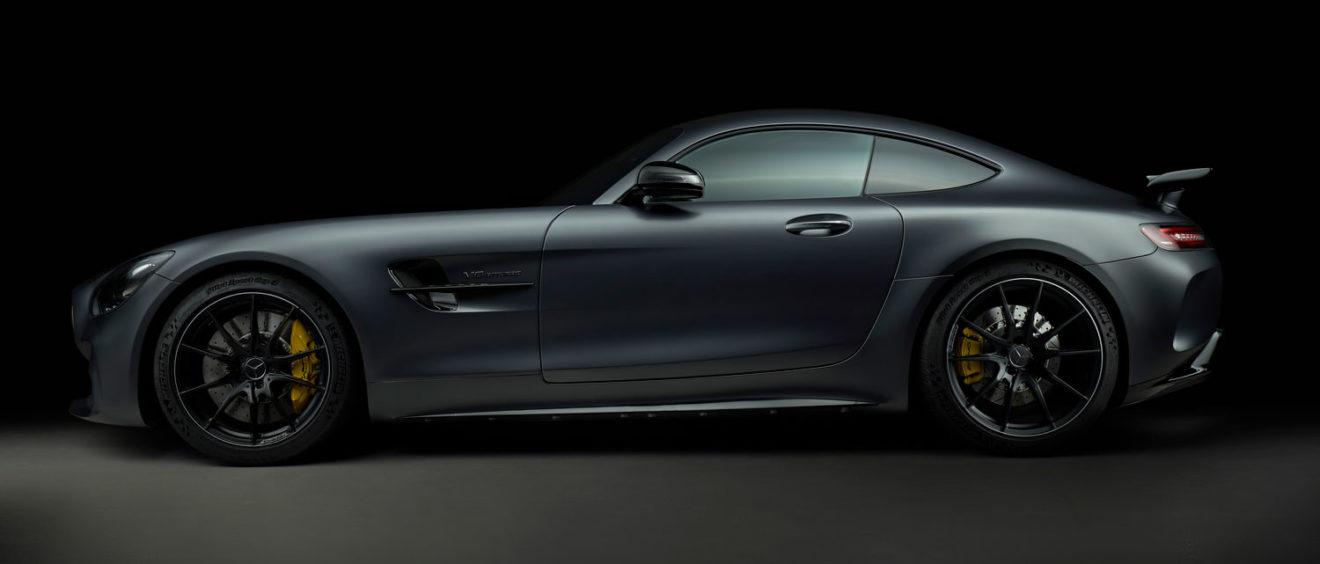
How did I actually create that image of the Mercedes AMG-GT R with the light painting technique I’m talked about on Instagram? Basically if you are familiar to long exposure photography, it is actually not that complicated. All you need are three things:
- a fairly dark environment
- a camera on a tripod
- a consistent light source
How to get started?
Because you actually shoot a long exposure image, while painting with your light source, you should mount your camera on a sturdy tripod. Please avoid any camera shake, because we might need more than one image to get our result,
For this type of photography it’s a very good investment to buy a relatively decent tripod. In my opinion, it is way more important than a fancy camera or lens. Otherwise, you can’t stack your images on top of each other in Photoshop. There is nothing worse when you open your pictures after a long day of shooting on your computer and see that 99% of the images are unusable. Been there done that and I can only tell you to avoid that experience.
Sure, sometimes you can place your camera on the ground or any other place but most of the time you sacrifice a good angle. When you are under time pressure like I was in this case, you won’t search for ages to find a place that might work and then move that expensive car just to frame it somehow in the camera.
Now, switch your camera to manual mode and set your aperture to the sharpest sweet spot of your lens. For many lenses it should be somewhere in the range of f8 and f11. Set the ISO at 100 or 200 and the shutter speed at a minimum of 10 seconds or longer, depending on the ambient light and how fast you can move.
For most cameras, focusing in a dark environment is a huge challenge. Use a flash light or your smartphone light to brighten the object just enough that your camera can focus properly. Once the image is sharp, switch to manual focus to keep it locked! Take a test shot to see if the image is underexposed enough to get a nice contrasty image if you add light.
Now it’s finally time to paint your image with light. There are a few options you can use a light source.
Smartphone
For small objects like product pictures, a smartphone is totally fine. There are apps which turn your screen to any colour you want which is a pretty good option to get started and learn the technique.
Torch light
For slightly bigger objects you could use a torch light. There some fancy ones just for photography. Unfortunately, they are quite expensive and often they are too powerful and you have always a round spot which is not easy to handle to get good results. You could put them in a big soft box though.
LED stick light
If you are getting more serious, I can recommend using an LED stick light. With these lights you can adjust brightness and colour temperature. The most expensive one is called Icelight made by Westcott. Apparently it should be the best one on the market but I never tested it and can’t say anything about it. Some third party companies produce way cheaper lights and if you are sometimes using that technique and won’t use it that often I would choose one of those. Yongnuo is one brand I have some experience with. The speed lights are phenomenal in terms of price and specs, same goes for the LED light. You can even use it as a video light and is often in my bag, for many purposes.
Modelling light or a big video light with soft box
For the AMG GT R in this photo a stick LED light would be still a bit small. I actually used the modelling light of my Profoto B2 Light and attached a big soft box to it. I know for many of you that might be overkill and I totally agree. Any cheap studio light or video light with a big soft box would do the trick as well.
So you got your camera on the tripod, your light source in play, focus is properly set, now what?
Before you press the shutter button or ideally or the remote control for your camera, you should know beforehand, which parts you actually wanna light up. A shape only comes alive, if you create light and shadows in a good way. Therefore, you must know beforehand which parts want to brighten and which parts should remain darker. If you did a lot of dodge and burn in Photoshop to enhance shapes you got a good feeling already.
If you are thinking now: “Dodge and burn, what the fuck is he talking about!” don’t stop reading, I’ll explain everything now!
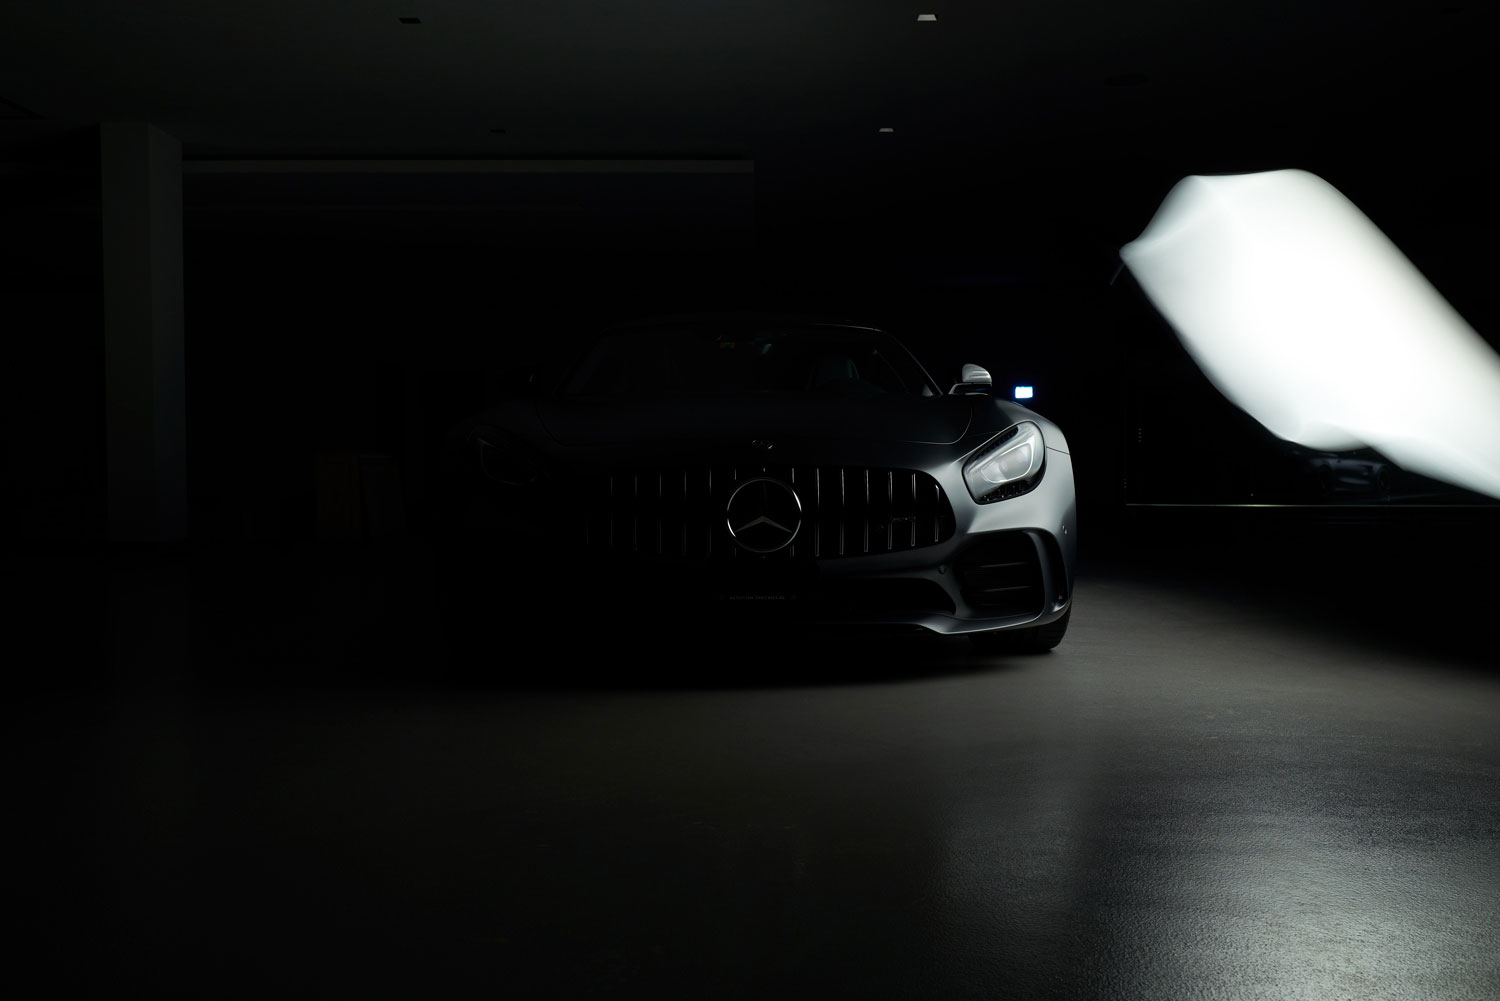
Look at the image of the AMG GT R. It is always a good starting point to light stuff from the top, which creates naturally a pretty dramatic look. That would be your starting point. Once you press the shutter button you got exactly as much time as the shutter stays open. If your shutter speed is adjusted to 15 seconds, you got exactly 15 seconds to walk with the light from the back to the front of the car, while holding it above the car pointing downwards. If you don’t walk too fast and not too slow you magically get a perfectly lit image of the car. It takes a bit of practice and a few attempts until you achieve a good result, so keep practising.
Hold on a minute, why aren’t you visible in the frame?
Due to the long exposure, the camera picks up bright sources more than darker ones. In case you are not wearing a highly reflective jacket or a neon coloured outfit, the light in your hand should be brighter than your body. Because you move, the difference of bright and dark spots is even more dramatic. The faster you are the less chance is there that you might appear in the frame. If you are too slow some ghosting might become visible.
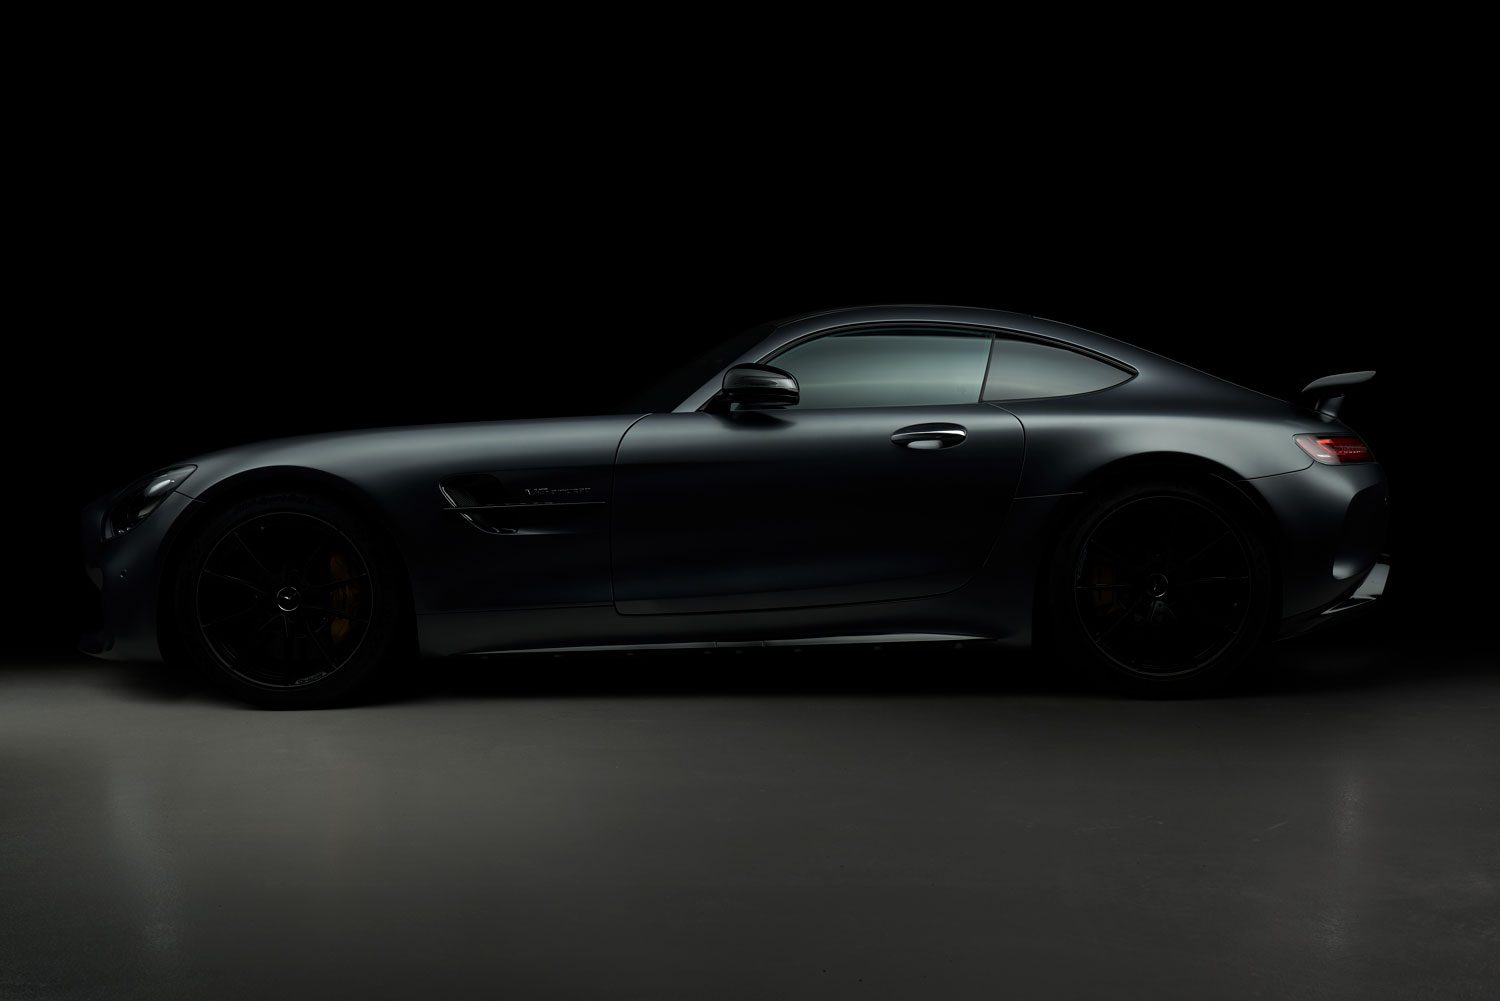
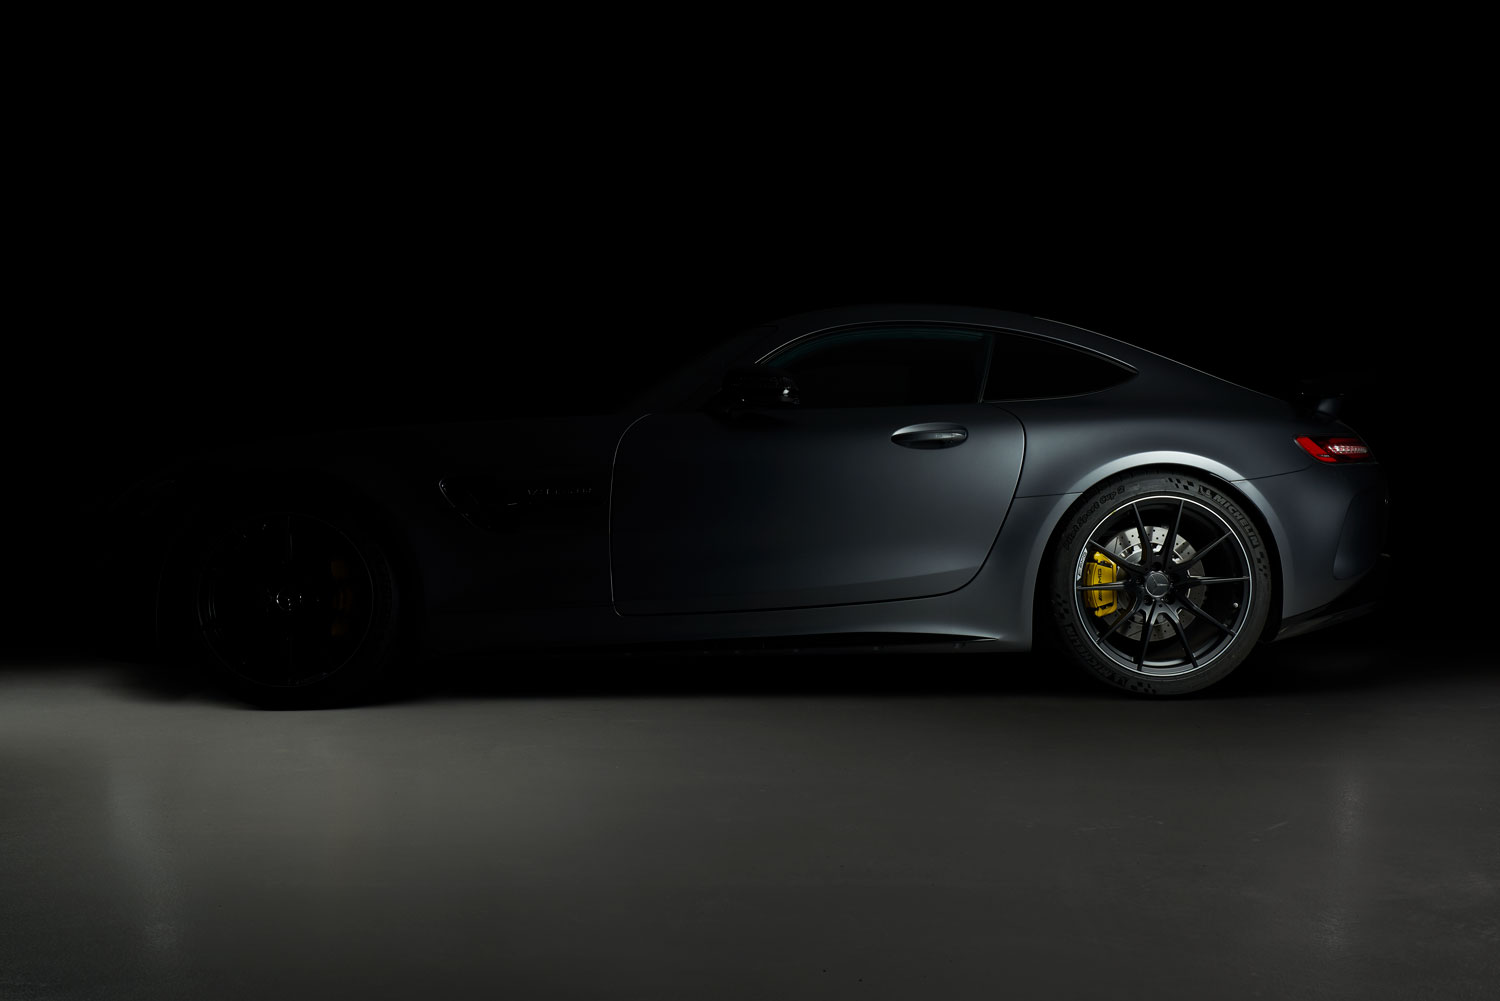
Alright, you got your base image now but you want to have that perfectly lit car. All you gotta do is lighten the other relevant parts, which are still underexposed. I lightened the side panel a bit pointing the light in a 45° angle downwards. And I lightened some smaller parts like the wheels and the rear spoiler.


OK, images are done, what should I do in post?
Let’s say you didn’t catch everything in one frame, (which is mostly the case, at least for my style of photography) all you need to do is loading your images as stacked frames into Photoshop. Simply click on “File” – “Scripts” – “Load files into stack” and choose the frames you wanna use. Photoshop will automatically stack them on top of each other.
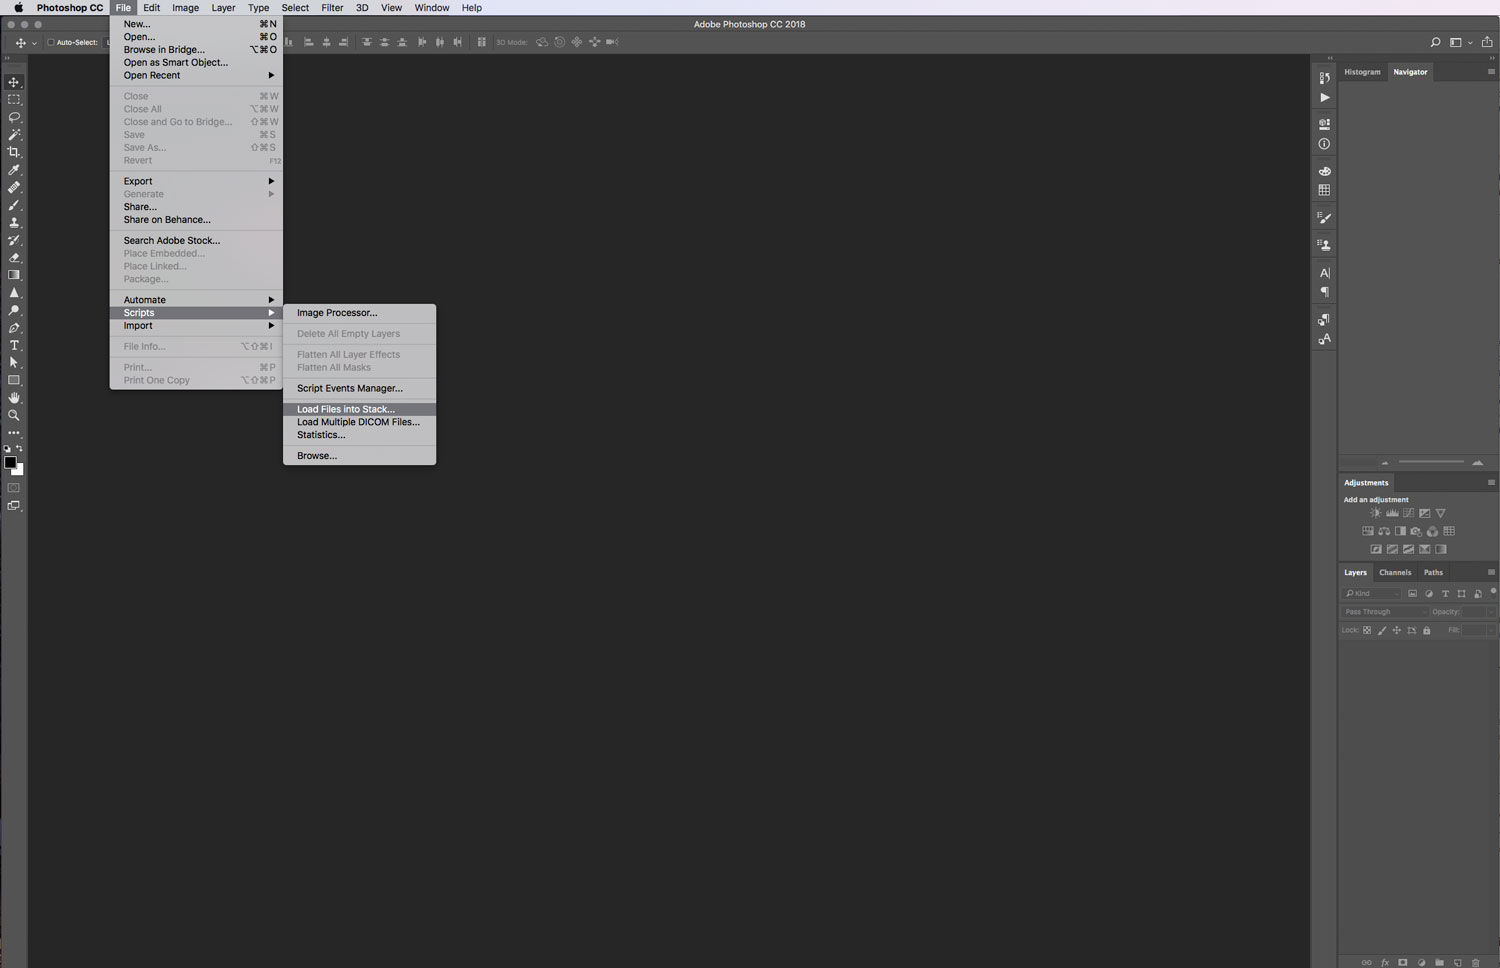
Now if you used a sturdy tripod and didn’t have any camera shake the images should line up perfectly. If they didn’t, switch the blend mode to Difference and nudge them until they are aligned perfectly. Switch the blend mode of the images on top of the base image to lighten. Now you should only see the lightened parts of these images. Turn all the layers off, except the one above the base layer. Next, you can mask out the parts of the layer, you won’t need or tone them down with a soft brush and a low opacity, if the effect is too much.
Just do the same for each layer. Switch it on and mask out the parts you don’t need. Rinse and repeat until you got your final image. For the AMG GT R I think I used around 8-10 images to get the final result. Finally, I would retouch all the blemishes, fix the exposure and put on a final colour grade.
Basically, that’s how you do a light painting image. I’m a huge fan of this technique because you can lighten up huge objects without having big light sources. Especially for car photography it is a big advantage. If you compare it to the massive studio spaces where they use a gigantic soft box above the cars, this is a pretty decent solution to work in different locations.
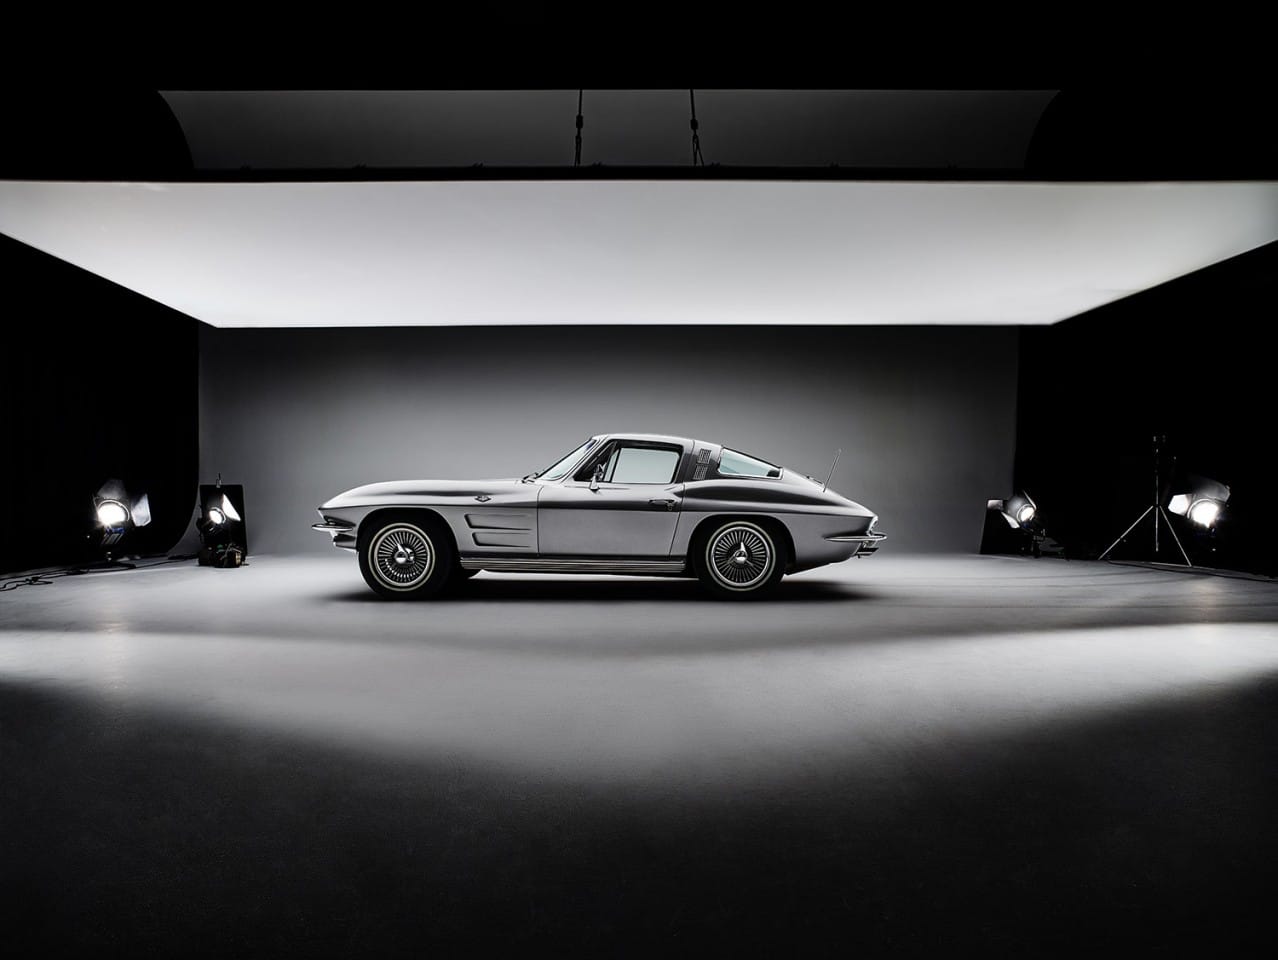
Don’t get me wrong, I would love to shoot in a big studio, which is a complete different game but I like having some techniques in my toolbox that can imitate a sort of similar result and impress my clients with it.
Now try it out on your own. I would recommend starting with a small object to practice your skills. Take a soda can for instance, which is a good shape to understand light and use your smartphone to paint your image. You will learn quickly how the light has to fall to get a good result.
And if you got any questions or just want to show some love, leave me a comment. It would make my day…
Until next time,
Dominik